
Ham and Cheese Spiders: A Shockingly Easy Treat
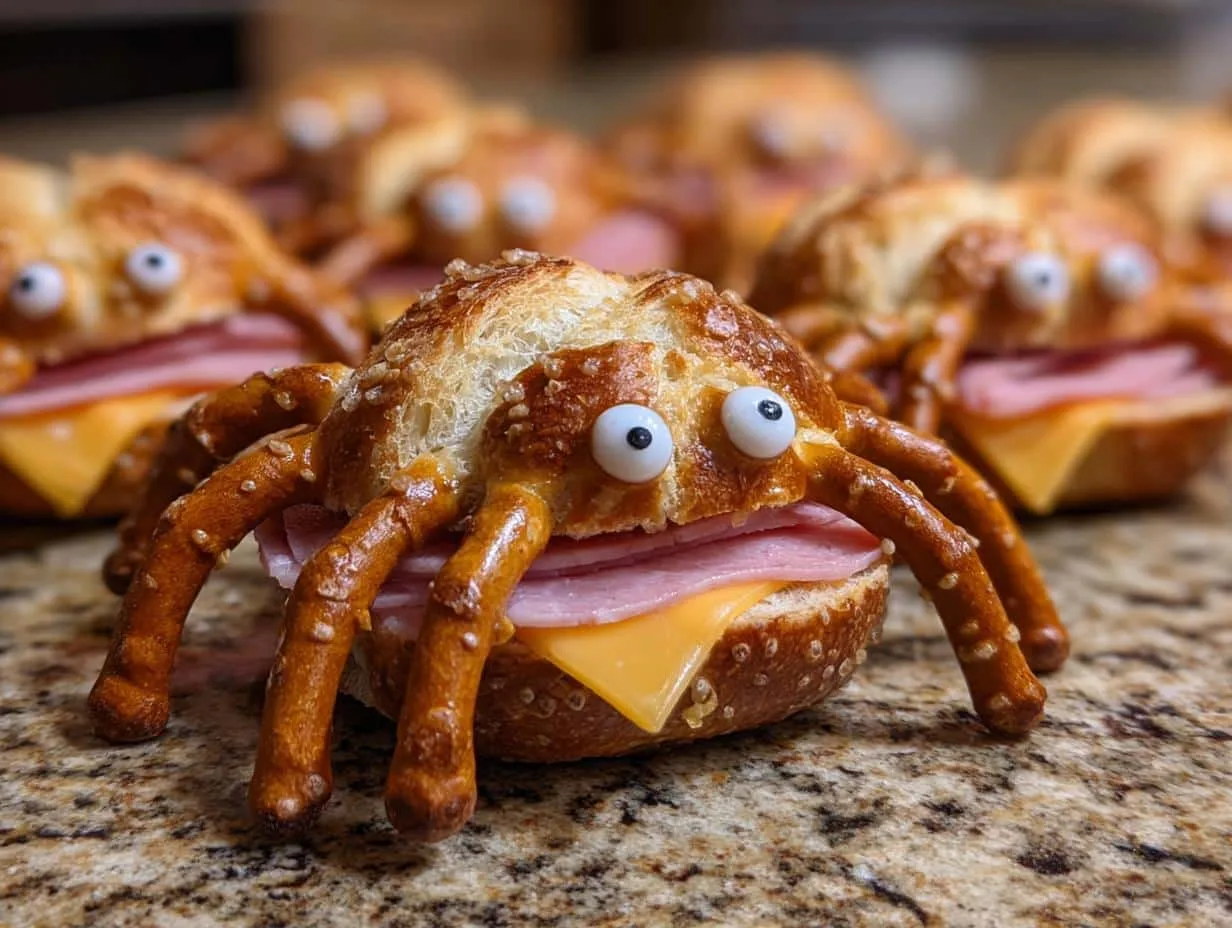
Ham and Cheese Spiders: A Shockingly Easy Treat is an easy, flavorful recipes ready in 35 minutes. It delivers a rich, comforting taste using simple pantry staples with minimal prep work. Serve warm alongside your favorite fresh sides or a crisp green salad for the perfect family meal.
Okay, friends, Halloween's creepin' up, and you know what that means? Time for some spooky and yummy snacks! Forget the complicated, Pinterest-fail recipes. I'm talkin' about somethin' super easy, totally kid-friendly, and seriously fun: ham and cheese spiders!
These little guys are the perfect way to get into the Halloween spirit without spendin' hours in the kitchen. Plus, picky eaters? They LOVE 'em. I'm Casey Mitchell, by the way – a Texas home cook obsessed with simple recipes that taste like home. And trust me, these ham and cheese spiders? They're a total home run. I remember making these (well, okay, a less spider-y version!) with my grandma when I was little. We'd use cookie cutters to make all sorts of shapes. This is WAY easier, though!
Get ready to whip up the cutest, creepiest, and tastiest snack of the season. Let's get spider-makin'!
Why You'll Love These Ham and Cheese Spiders
Seriously, what's not to love? These ham and cheese spiders are a total winner because they're:
Quick and Easy Ham and Cheese Spiders
I'm talkin', like, 15 minutes tops! If you're in a rush but still wanna make somethin' festive, these are your new best friend.
A Fun Treat: Ham and Cheese Spiders for Kids
Kids go absolutely bonkers for these! They're adorable, fun to eat, and a sneaky way to get some protein and calcium in 'em. Plus, they can even help assemble them – fun activity alert!
Perfect Party Snack: Ham and Cheese Spiders your guests will adore
Throwing a Halloween bash? Need a cute snack for a school event? These ham and cheese spiders are always a hit. They're easy to transport and everyone loves 'em, big and small!
Tips for Perfect Ham and Cheese Spiders
Want to take your ham and cheese spiders from cute to AMAZING? Here's a few little tricks I've learned:
- Bread Matters: Soft bread works best, so the pretzels stick easily.
- Chill Out: Pop the finished spiders in the fridge for about 10 minutes before serving. This helps everything stay in place and prevents the bread from getting soggy.
- Freshness First: Make these right before you need them. If you have to make them ahead, wrap 'em tightly in plastic wrap to keep the bread from dryin' out.
Variations on Ham and Cheese Spiders
Okay, so you've mastered the basic ham and cheese spider. Awesome! Now, let's get a little wild and see what other creepy creations we can come up with! These are just suggestions, of course – feel free to let your imagination run wild!
Adding Vegetables to Your Ham and Cheese Spiders
Wanna sneak in some veggies? Thinly sliced bell peppers (red, yellow, or orange!) make great extra legs. Cucumber slices are also a fun addition. Just tuck 'em under the ham and cheese. The kids won't even notice (maybe!).
Different Cheese Options for Your Ham and Cheese Spiders
Cheddar's a classic, but don't be afraid to branch out! Provolone gives a nice, mild flavor. Swiss adds a little nuttiness. And if you're feeling fancy, a little pepper jack can add a nice kick! Just make sure it melts well (though, these are no-cook so, you know, for flavor!).
Mini Slider Ham and Cheese Spiders: Party Lunch Bites
Throwing a party? Make mini slider spiders! Use small slider buns instead of regular bread, and just scale down the other ingredients. These are perfect little bite-sized snacks that everyone will love. You could even use those Hawaiian sweet rolls for a touch of sweetness!

Serving Suggestions for Your Ham and Cheese Spiders
So, you've got your ham and cheese spiders all ready to go – what should you serve with 'em? I like to keep it simple! A side of fresh fruit (grapes or apple slices are always a hit), some baby carrots or cucumber sticks, and maybe a few chips or pretzels. It's all about a balanced and fun snack!
Storing Your Leftover Ham and Cheese Spiders
Got leftover spiders? (Wow, you must have really nailed the recipe!) The best way to store 'em is in an airtight container in the fridge. But heads up – they might get a little soggy overnight. To combat that, try wrapping each spider individually in plastic wrap before putting them in the container. Reheating isn't really recommended (they're best cold!), but they'll still be tasty the next day!
Nutritional Information for Ham and Cheese Spiders
Okay, folks, just a quick note: The nutrition info for these ham and cheese spiders can vary a LOT depending on the bread, ham, and cheese you use. So, the numbers you might see aren't exact. It's just a general idea, okay? Don't come at me with your calculators!
Still Hungry? More Fun with Ham and Cheese Spiders!
So, what do ya think? Are you ready to give these ham and cheese spiders a try? I'd LOVE to hear what you think! Leave a comment below, rate the recipe, and don't forget to share your spooky creations on social media! What's your favorite part about these creepy-crawly snacks?
Ham and Cheese Spiders: A Shockingly Easy Treat
Ingredients
Instructions
-
1
Prep & Preheat
Preheat oven to 350°F (175°C) and prepare your baking dish with non-stick spray or parchment paper.
-
2
Mix Wet Ingredients
In a large mixing bowl, beat butter and sugar together until light and fluffy. Add eggs one at a time.
-
3
Combine Dry
Whisk dry ingredients together in a separate bowl, then gently fold into wet mixture until just incorporated.
-
4
Bake to Golden
Transfer to prepared dish and bake for 35–40 minutes until golden brown and a toothpick inserted comes out clean.
-
5
Cool & Serve
Allow to cool on a wire rack for 15 minutes before slicing. Serve warm with your favorite garnish.
Frequently Asked Questions
Can I make this Ham and Cheese Spiders: A Shockingly Easy Treat ahead of time?
Yes! You can prepare this dish up to 24 hours in advance. Store tightly wrapped in the refrigerator and reheat gently before serving for maximum flavor.
How should leftovers be stored?
Keep leftovers in an airtight glass container in the refrigerator for up to 4 days, or freeze in individual portions for up to 2 months.
What are the best ingredient substitutions?
You can substitute dairy-free plant butter 1:1, or use a certified 1:1 gluten-free baking flour blend without sacrificing texture or rise.